How can I display custom texture(s) on the ground?[]
The simplest way to display custom ground textures is to store tiles of 1 by 1 degree in the %ProgramData%\Tacview\Data\Terrain\Textures\ or %APPDATA%\Tacview\Data\Terrain\Textures\ folders.
Tacview supports textures of any size as long as they are recorded in WebP, PNG or JPEG files. Both 24-bit and 32-bit formats are supported. Which means that you can use the alpha channel of WebP and PNG files to smoothly blend an overlay on top of Tacview native terrain.
You must follow the same naming convention as SRTM3 and SRTM1 files. For example, to replace the north-west corner of Corsica you should create a tile named: C:\ProgramData\Tacview\Data\Terrain\Textures\N42E008.png
A suffix T/B/C (N42E008T.png for example) can be added for each tile where
T-> Transparent (50% merge with tacview default map)B-> Adaptive black outlinesC-> Adaptive color outlines
Example texture packs are available in the add-ons section of the website. [1]
Mapview[]
Use the third party add-on Mapview developed by Jacques Deyrieux to easily download tiles to cover an area of any size (subject to your system's limitations). See this video to find out how:

Tacview Tutorial - Using Mapview for Enhanced Terrain Textures
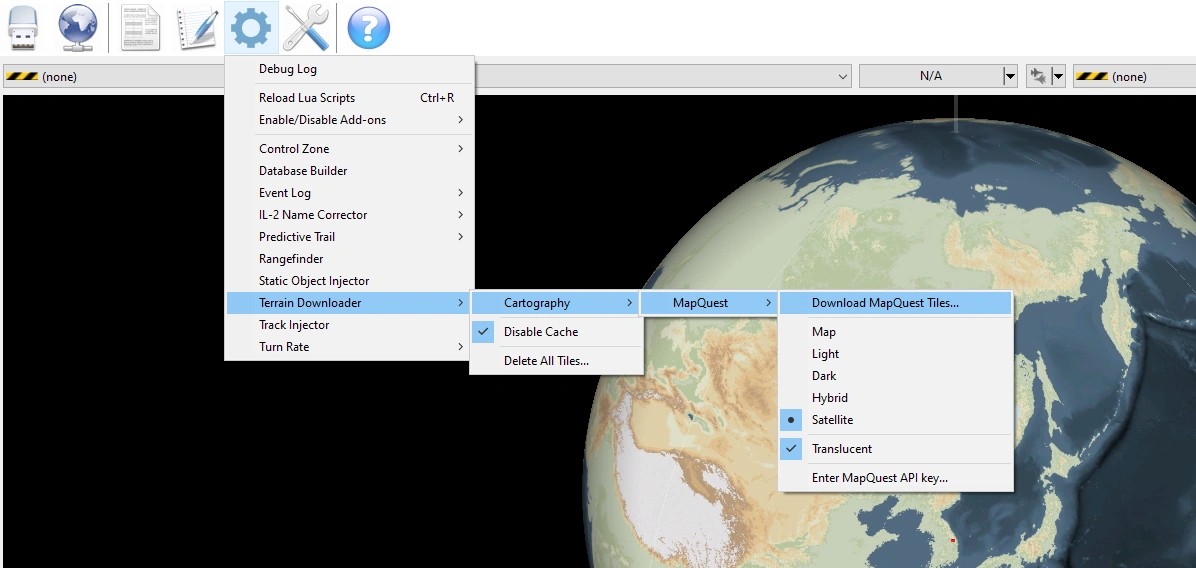
Terrain Downloader Add-on[]
Use Tacview's native Terrain Downloader add-on.
To activate the add-on, make sure you are using Tacview 1.8.5 or above and go to Add-ons → Enable/Disable Add-ons and make sure Terrain Downloader is activated.
Then go to Add-ons → Terrain Downloader → Cartography → MapQuest to select map options and download tiles.
First you will have to sign up for MapQuest at http://mapquest.com to get a MapQuest API key which you need to enter at Add-ons → Terrain Downloader → Cartography → MapQuest → Enter MapQuest API Key.
The add-on should download tiles to cover all the objects in the map, or, if there are no objects, it will download a 5 x 5 square around the camera's center.
Freeform maps[]
if you have a freeform map that you would like to add, you will need to know the coordinates of the four corners of your map.
Place your .webp, .jpg or .png map in %ProgramData%\Tacview\Data\Terrain\Textures\ or %APPDATA%\Tacview\Data\Terrain\Textures\
Suffixes T/B/C as described above can be used here as well.
Copy paste the file %ProgramFiles(x86)%\Tacview\Data\Terrain\Textures\CustomTextureList.xml to %ProgramData%\Tacview\Data\Terrain\Textures\
Manipulating the CustomTextureList.xml file now found inside %ProgramData%\Tacview\Data\Terrain\Textures\, follow the instructions in the file to add a new entry.
Satellite Maps[]
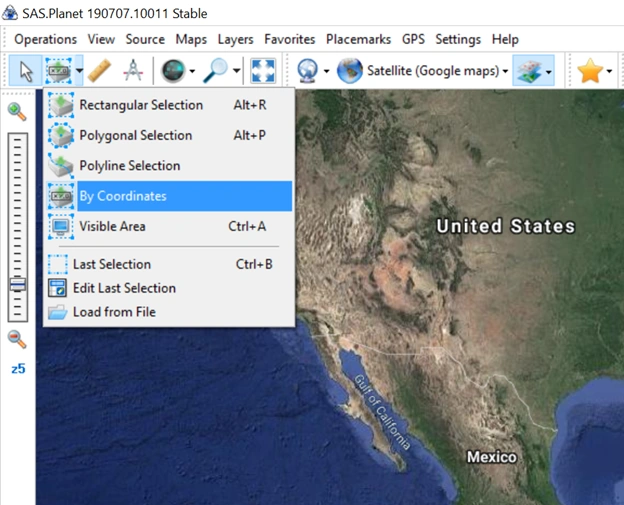
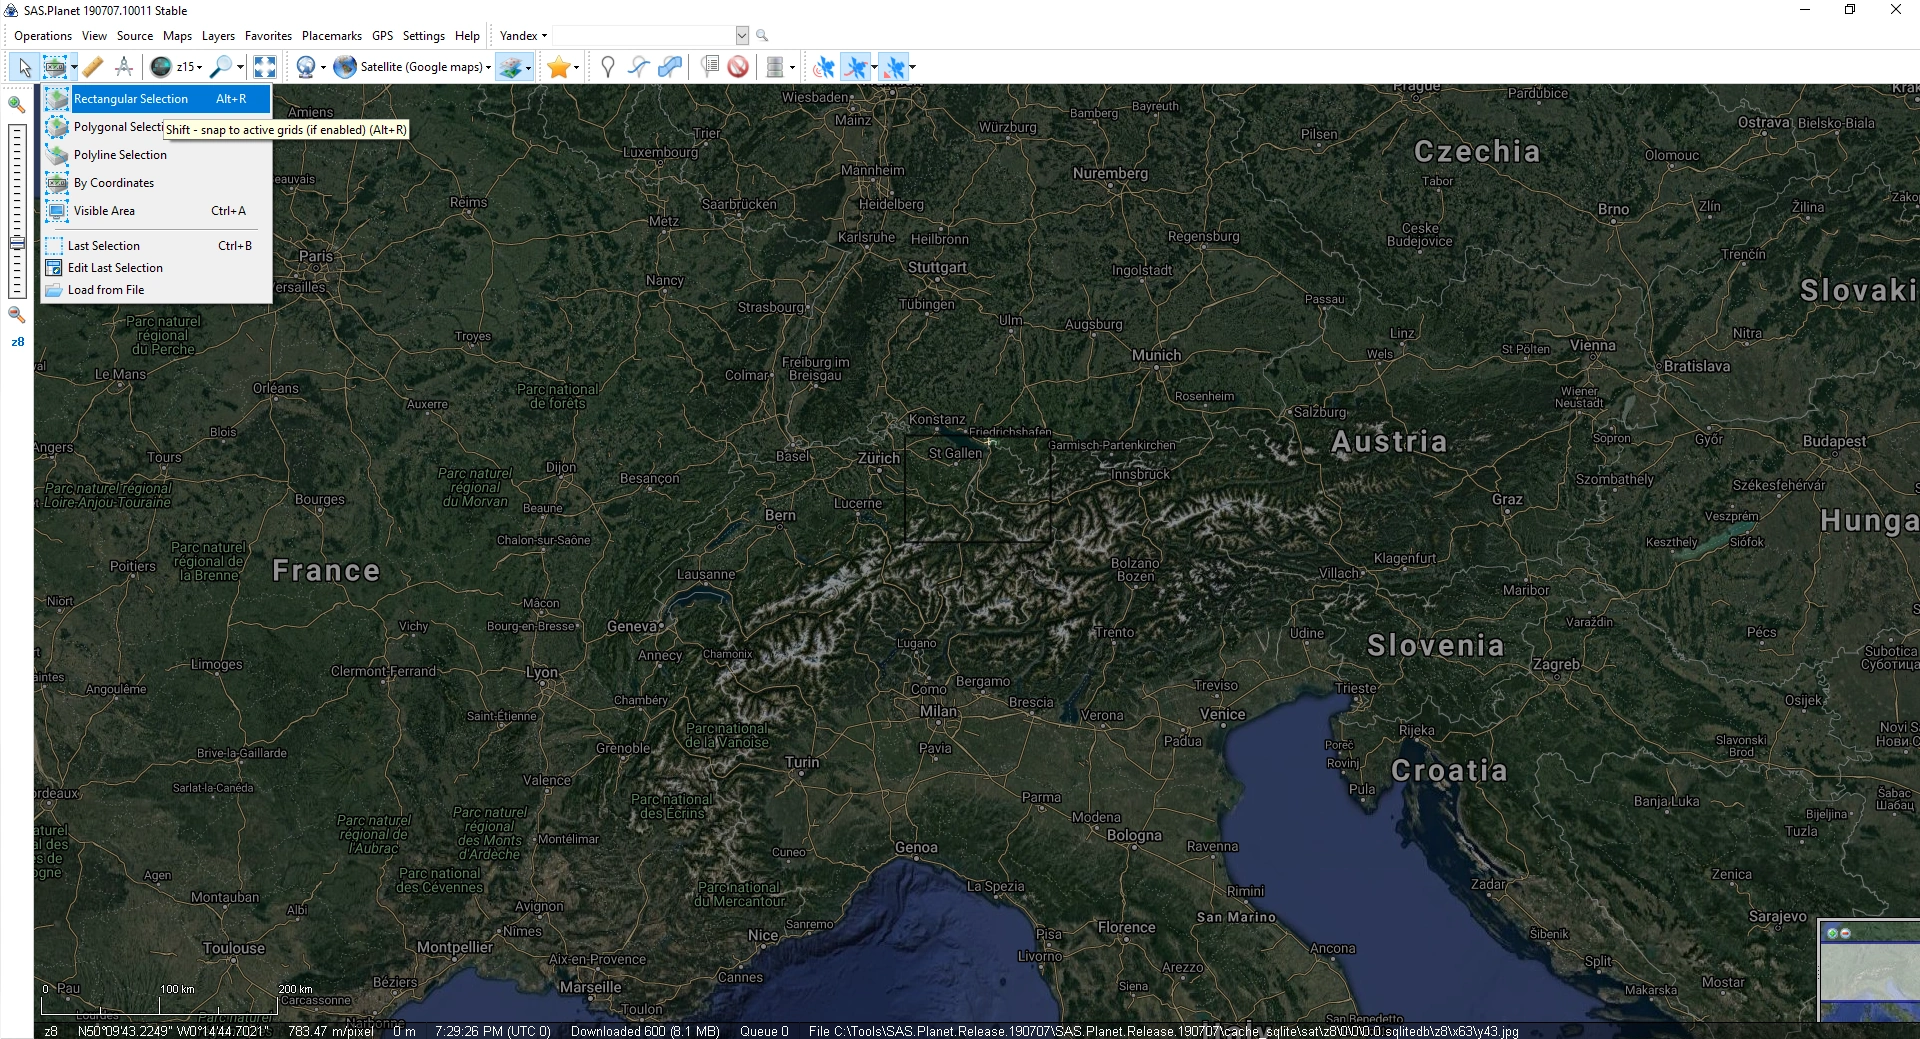
Satellite maps can be downloaded from SAS.Planet. Download the app then follow these steps to download tiles of 1 degree by 1 degree.
Select the area you are interested by coordinates.
.png)
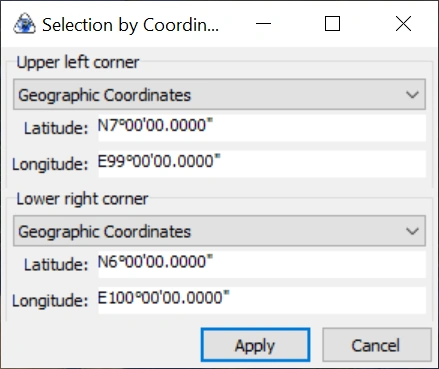
Notice that SAS Planet asks you to select your coordinates by entering the upper-left corner to lower-right corner of the area you are interested in.
Tacview requires tiles of size 1 degree by 1 degree so it is recommended to do one such tile at a time.
Tacview requires tiles named like N06E099 where (6,99) is the latitude, longitude coordinates of the bottom-left corner.
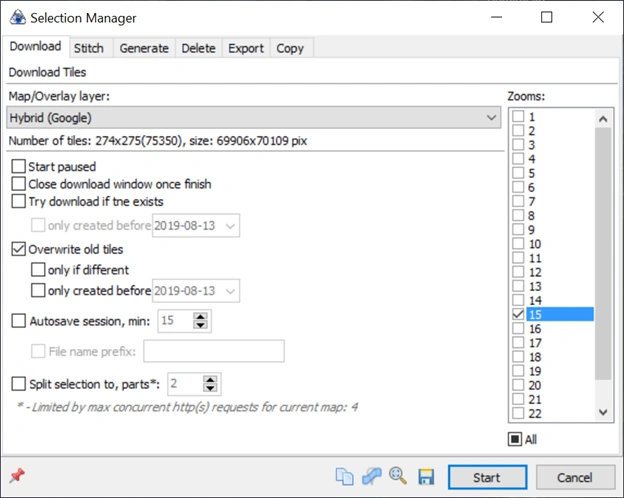
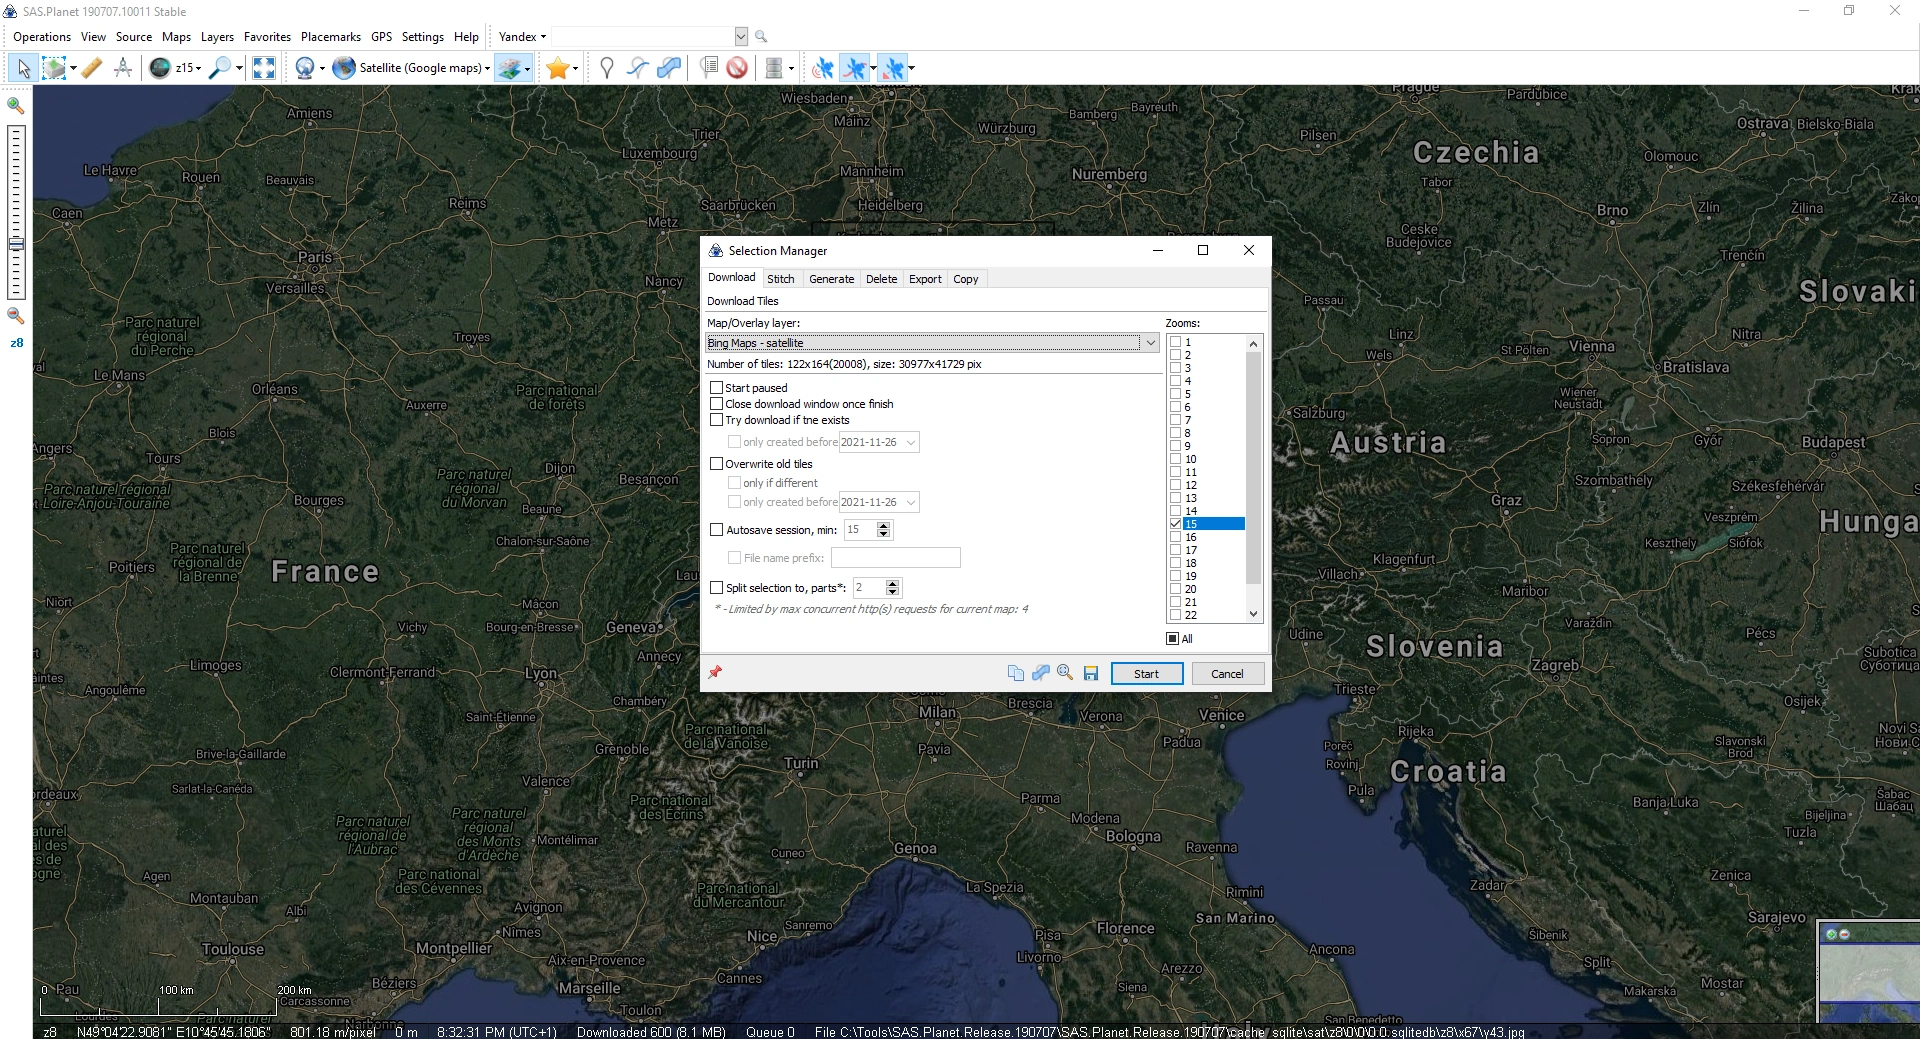
Step 1: Download the tiles[]
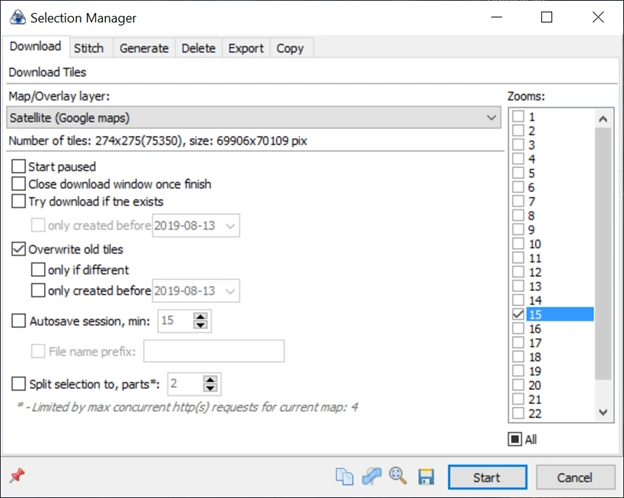
On the Download tab, select the Map/Overlay layer you want and the zoom level:
Zoom level 15 may be very high resolution for Tacview.
It is best to Overwrite old tiles unless you are sure all the tiles in your cache are good.
In this example, we are using Google Maps. Click Start - this may take several minutes.
If you wish to have extra details such as labels, you may next proceed to download a second layer such as Hybrid (Google) in this example:

.png)
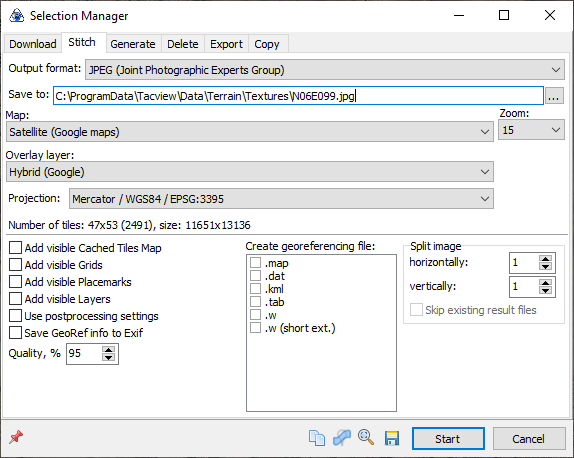
Step 2: Stitch the downloaded tiles together[]
Once you have downloaded what you need, go to the Stitch tab and specify the map, overlay layer and file name.
Save to %ProgramData%\Tacview\Data\Terrain\Textures\.
Remember Tacview tiles should be named after the coordinates of their bottom-left corner.
You may change Quality to 85%
Remember to pick your Zoom level
From the Projection dropdown select Mercator / WGS84 / EPSG: 3395.
Click Stitch to generate the tile.
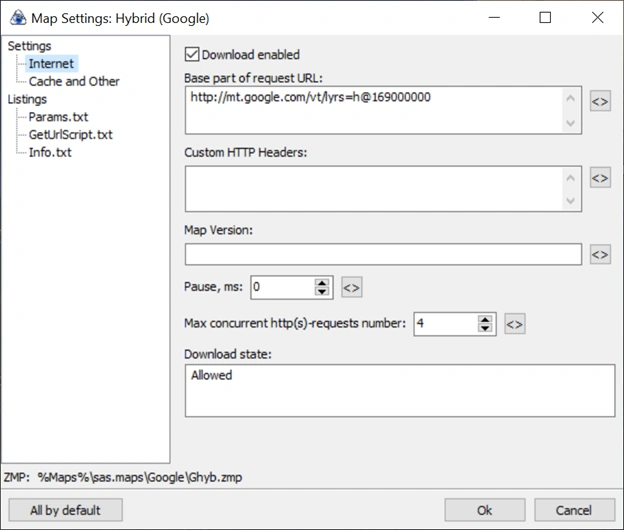
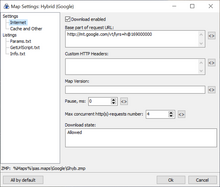
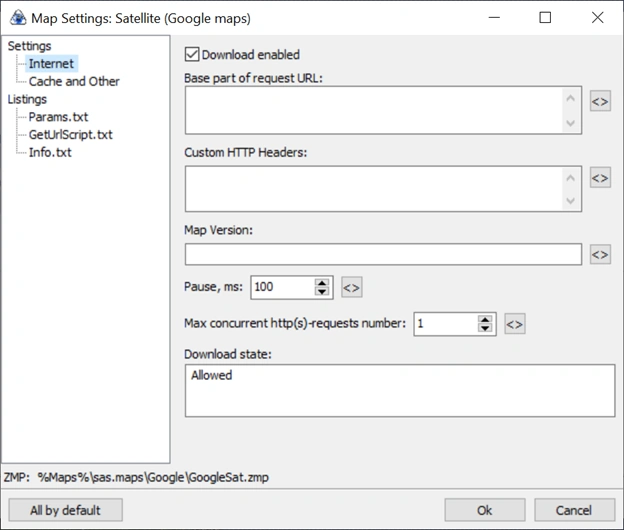
If the layers are in Russian, the native language of the program, go to Settings -> Layer Settings -> Hybrid Google and remove any language indication in the URL.
If tiles are not coming out nicely you can try deleting the cache and switching the program to source from Internet only. Then close and restart the program.

.png)

.png)
Also in Settings-> Map Settings and Settings -> Layer Settings, you can try changing Pause, ms to 100 and Max concurrent http(s)-request number to 1

.png)
Special Instructions for DCS World Users[]
In order to override the native DCS World terrain textures, after having downloaded tiles following the instructions above, move the downloaded tiles from
%ProgramData%\Tacview\Data\Terrain\Textures\
to
%ProgramData%\Tacview\Data\Terrain\Textures\DCS World\.
and re-launch Tacview. If you still don't see your tiles, note that certain types of terrain texture files override others.
First, by picture type:
- png
- jpg
- jpeg
- tga
- webp
Then by transparency:
- Original
- AdaptiveGreyScale (file name ends with "B"),
- AdaptiveColor ("file name ends with "C")
- Translucent (file name ends with "T")
So for example, if you don't see your tiles, try changing them to PNG, with no transparency.
How can I add higher-resolution elevation data?[]
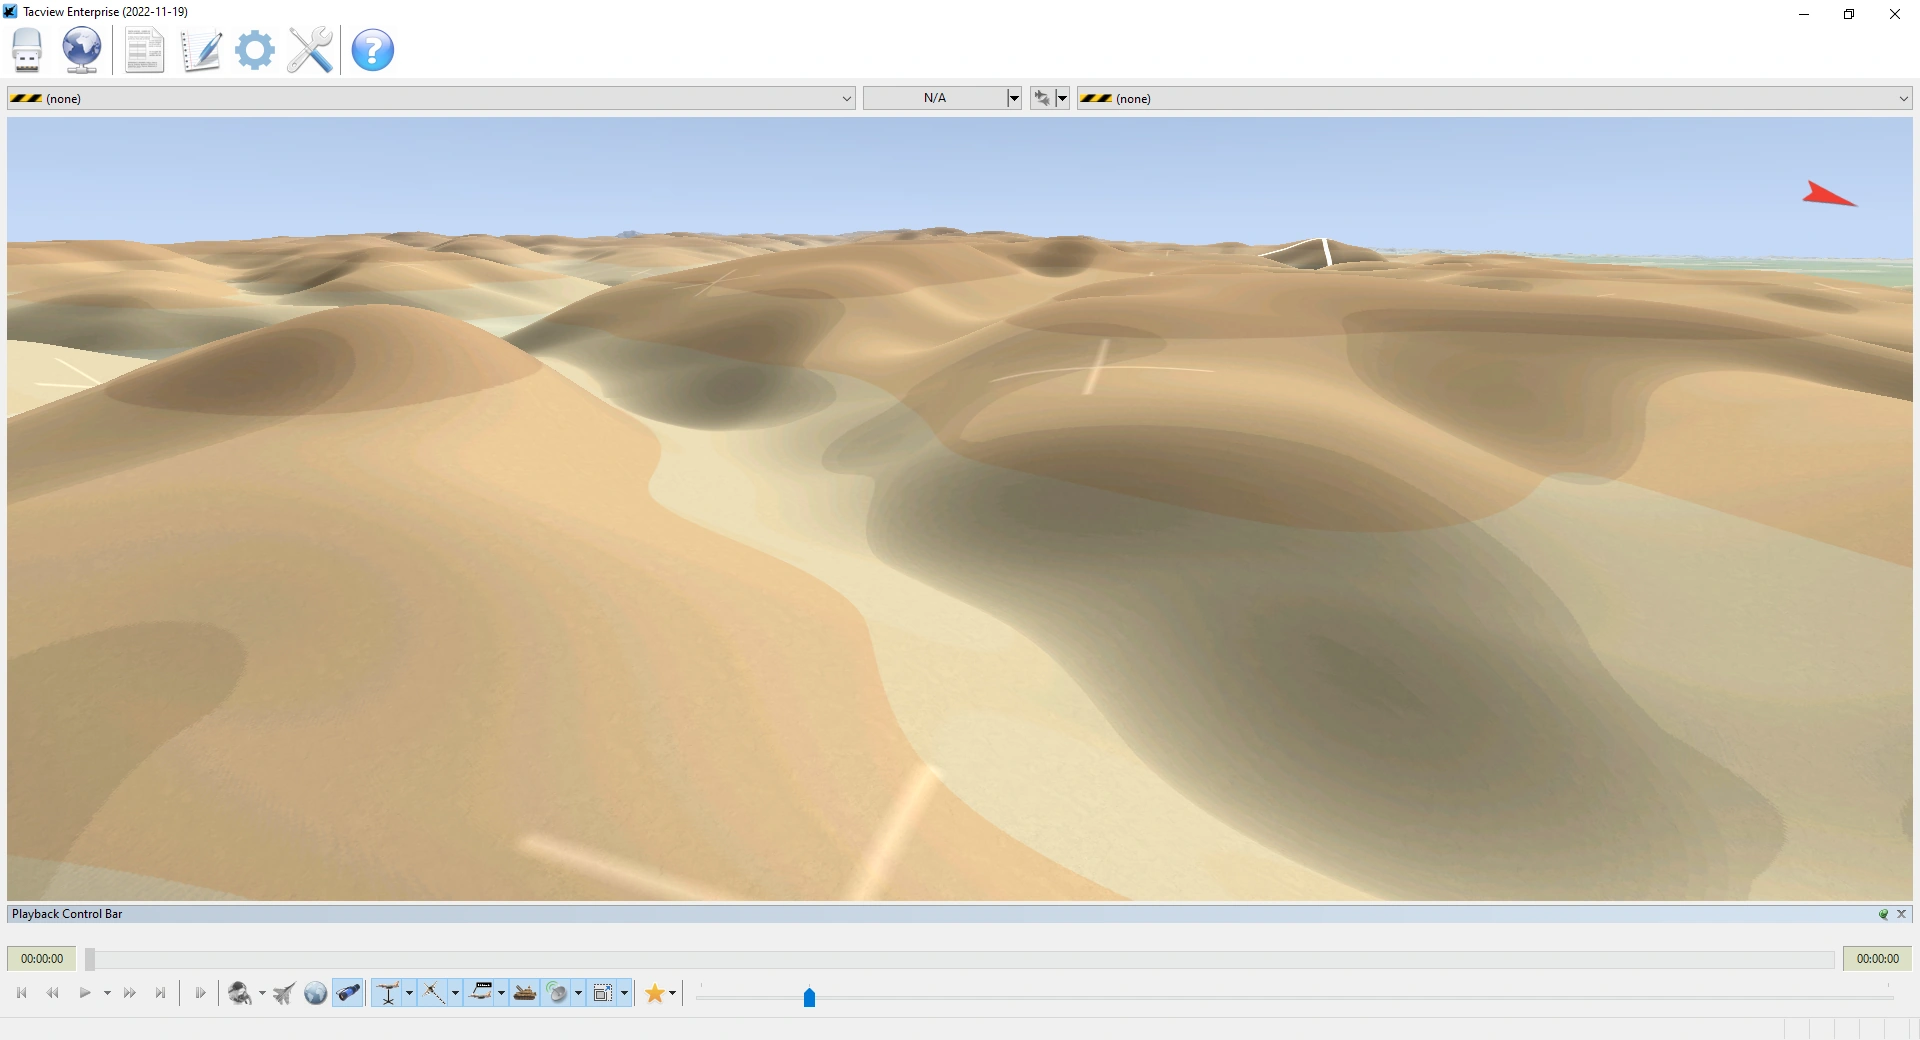
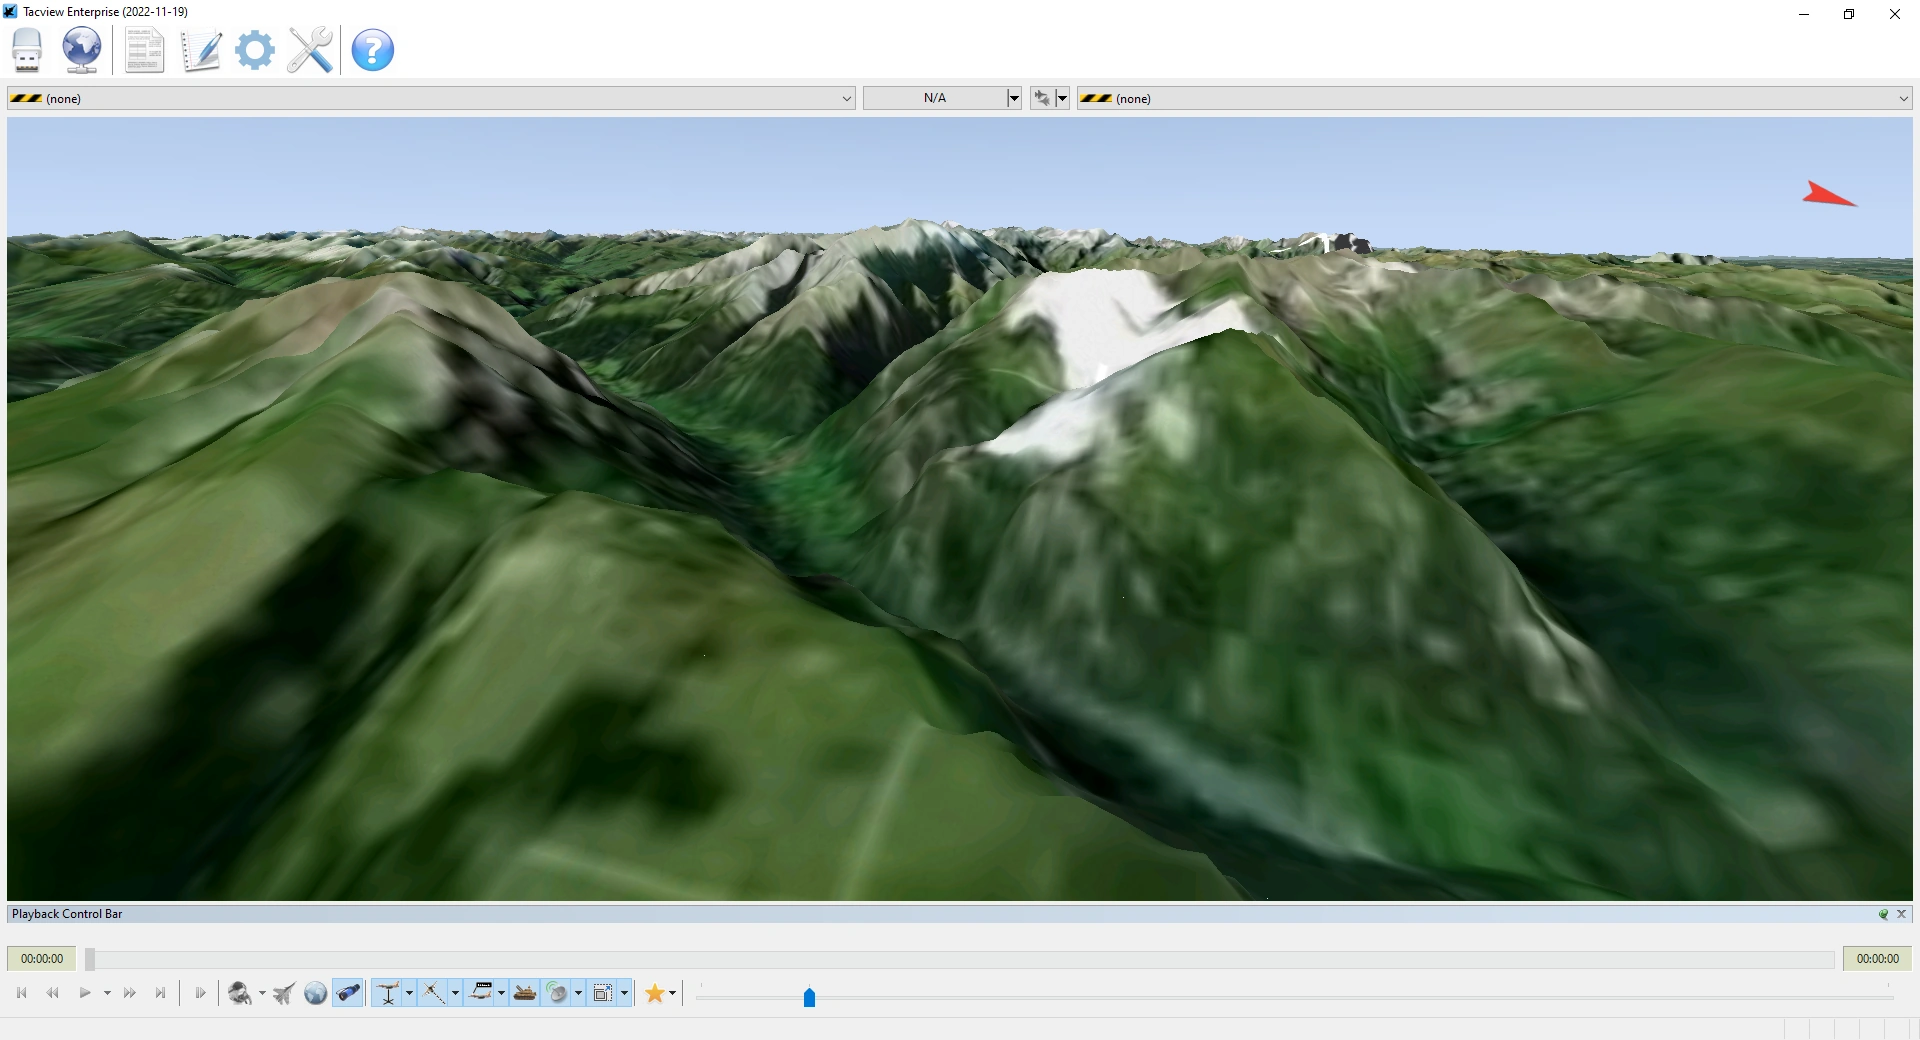
By default, Tacview displays ETOPO1 terrain over the entire spherical earth. Here are the Alps:
.png)
Tacview can also display SRTM30, SRTM3 and SRTM1 terrain. Your first step should be to download SRTM3 terrain for the area you are interested in. Just click on the area of the world you are interested in in order to launch the download.


After extracting, your files should look like this:

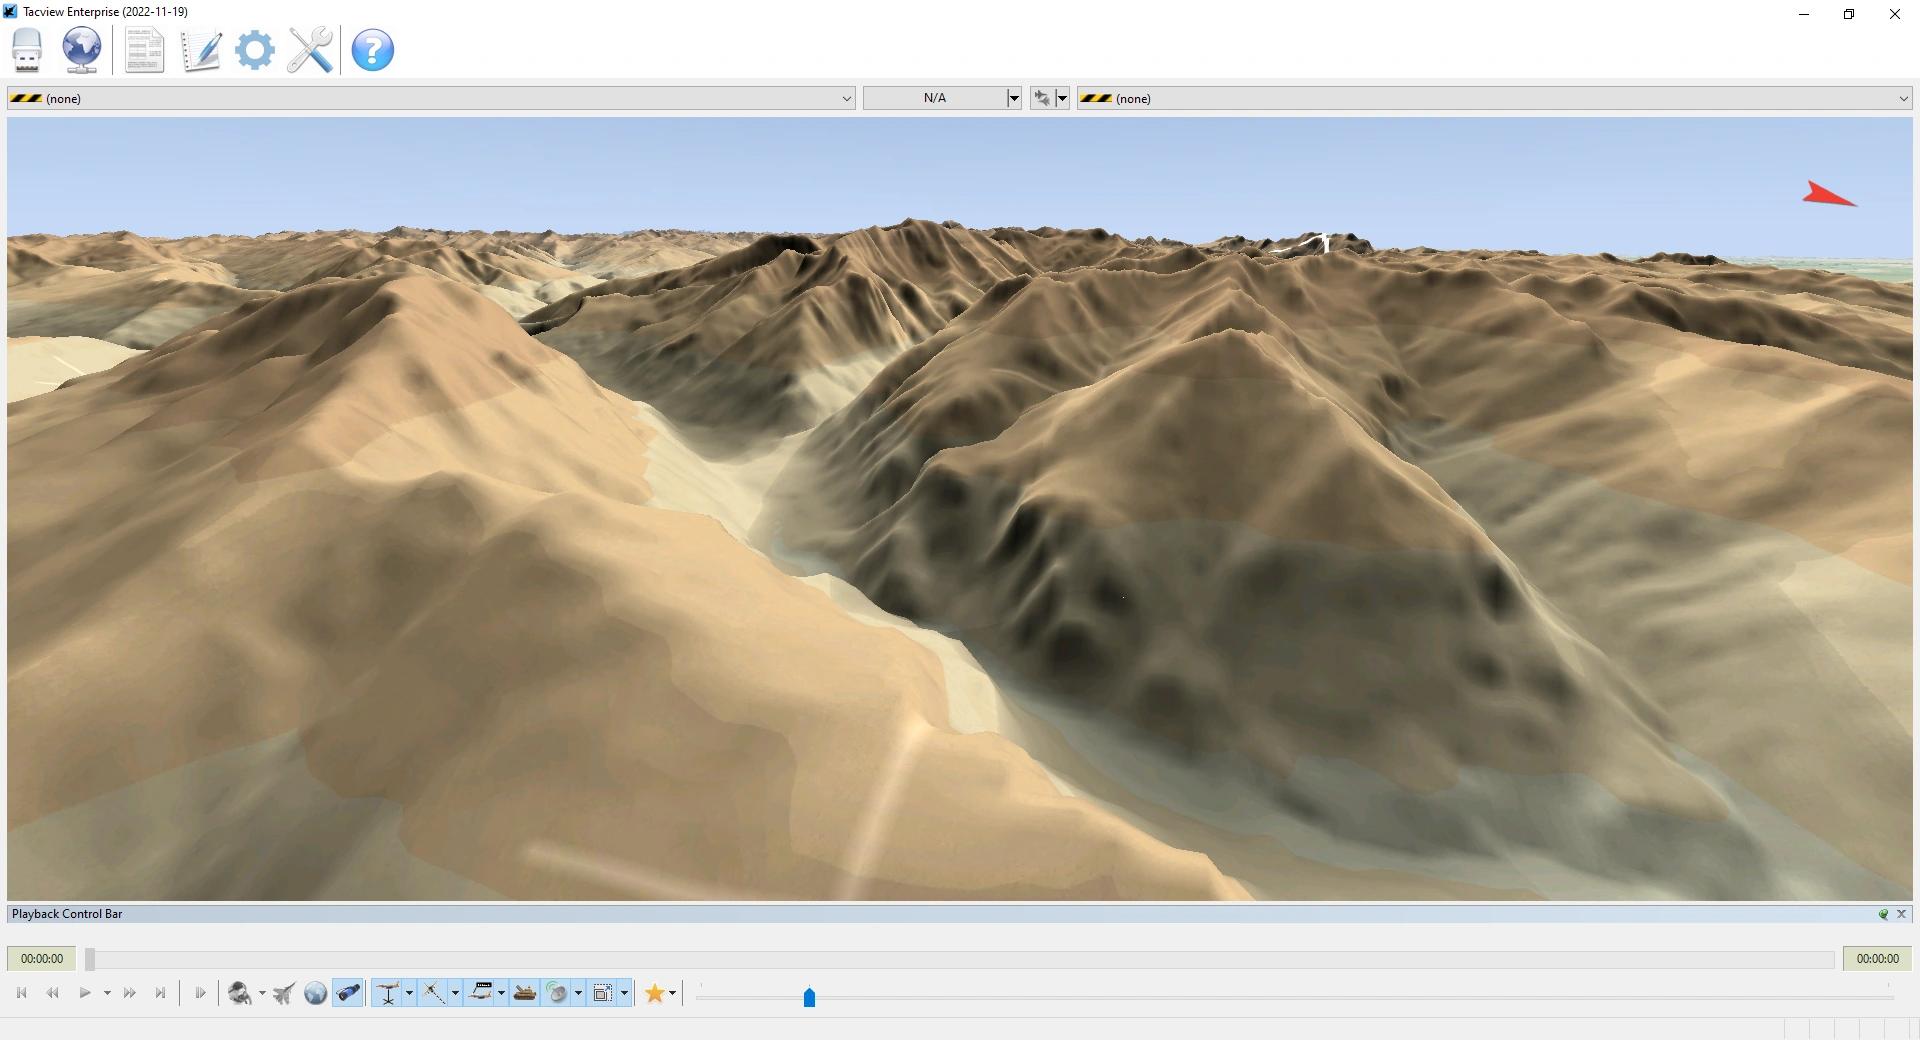
Copy all those files to %PROGRAMDATA%\Tacview\Data\Terrain\SRTM3\ and re-launch Tacview. Make sure you have selected Options -> Terrain -> Real Terrain.

.png)
You may download as many SRTM3 tiles as you wish without significantly impacting performance.
How can I add my own custom elevation map?[]
Have your custom elevation map ready in RAW format.
Copy the file
C:\Program Files (x86)\Tacview\Data\Terrain\Custom\CustomHeightmapList.xml
to the folder
%ProgramData%\Tacview\Data\Terrain\Custom\
Open the file which is now in your Program Data folder. Following the instructions and examples in the file, add a new entry for your RAW file. Place your RAW file in the same folder. Re-launch Tacview.
Putting together custom terrain elevation and textures[]
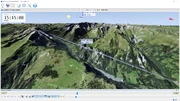
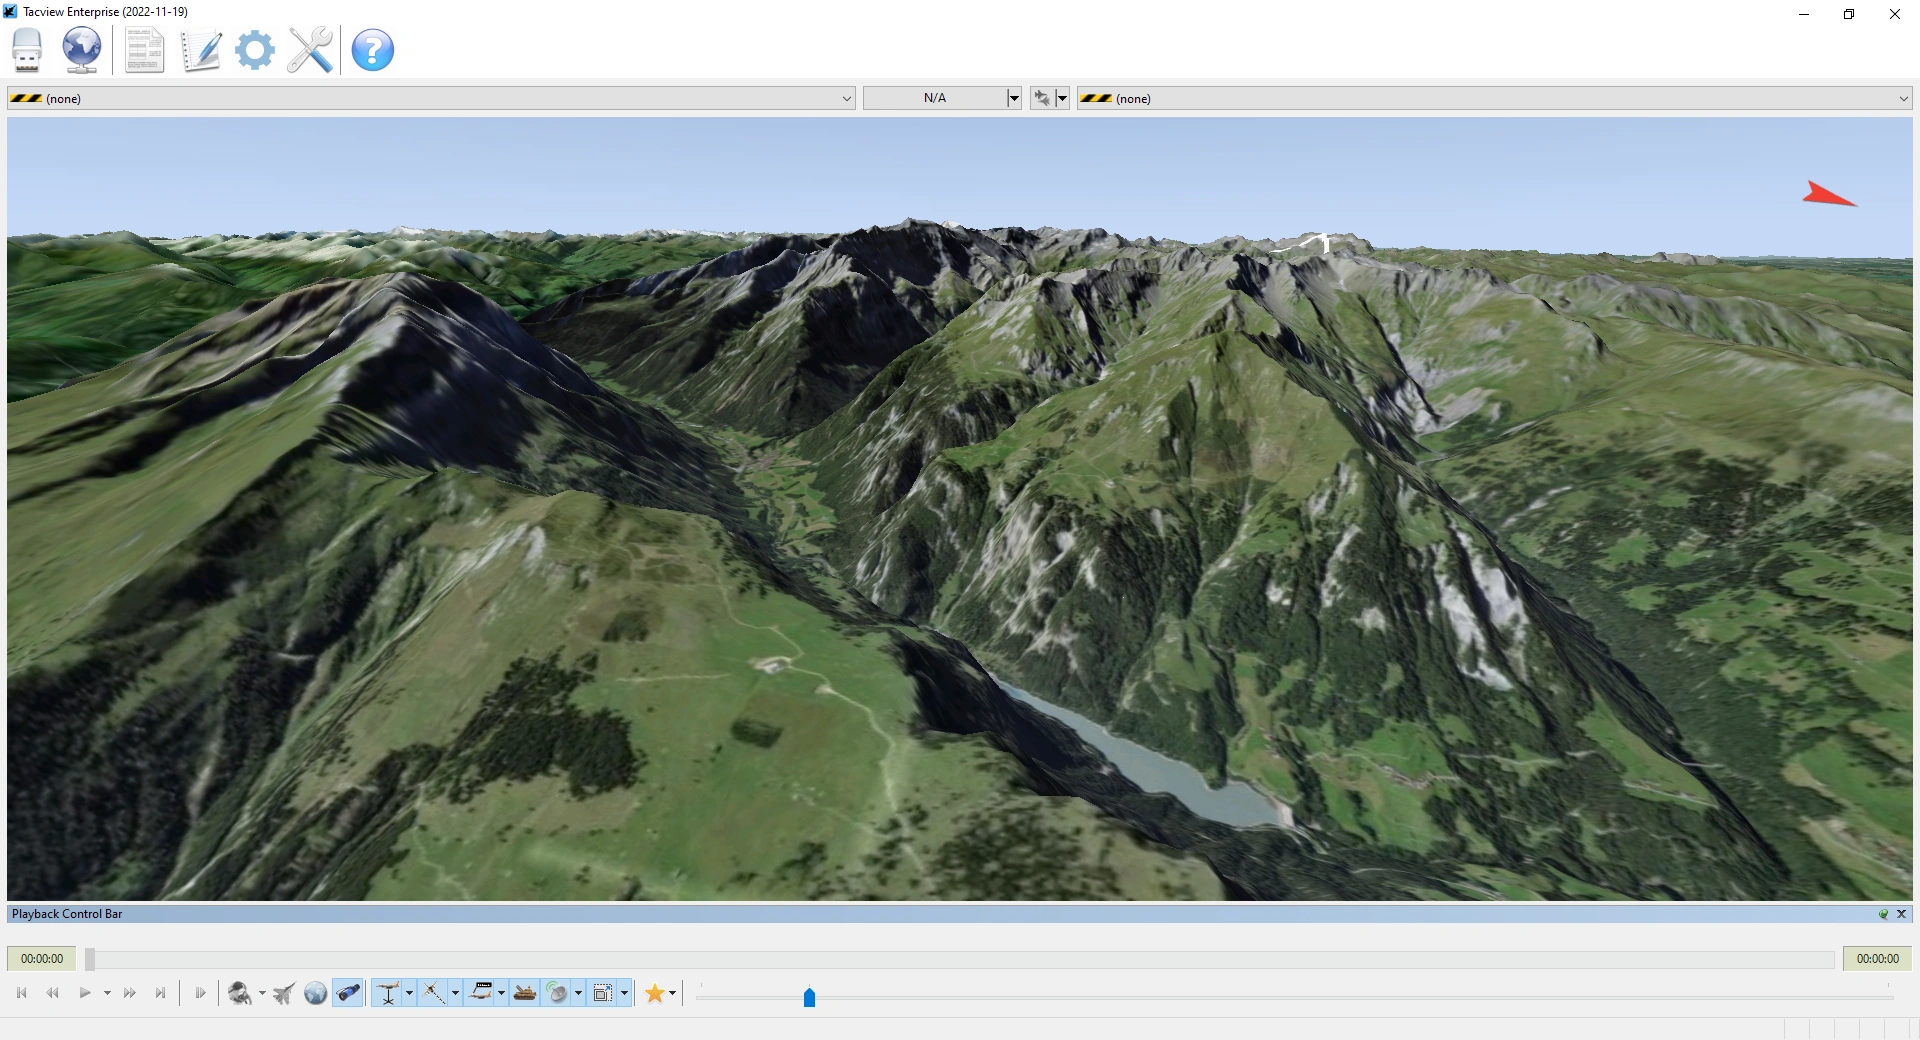
Want your installation of Tacview to look more like this?

This level of resolution is possible over very small areas, while lower levels of resolution can be sustained over larger areas.
Step 1: Elevation Data[]
Download elevation data following the steps in the above section How can I add my own custom elevation map?
Step 2: Terrain Textures[]
Next, download some terrain textures using the add-on Terrain Downloader (or one of the other methods listed above).
To mimic the screenshot at the top of this page, choose Satellite maps, not translucent.
After downloading the tiles, re-launch Tacview. Make sure you have selected Options -> Terrain Display Mode -> Custom Textures

.png)
You may download as many texture tiles through this add-on as you wish without significantly impacting performance.
Step 3: Very High Resolution Satellite Textures over Smaller Areas[]
To get higher resolution over a smaller area, use SAS Planet
Draw a rectangle around the area you are interested in - not too big (1 degree by 1 degree maximum for zoom level 15 - smaller for higher zoom levels).
Choose Map/Overlay layer: Bing Maps - satellite and Zoom: 15

Click Start to launch the download. When it's done, go to the Stitch tab (if the window closed, re-open it by pressing CTRL+B)
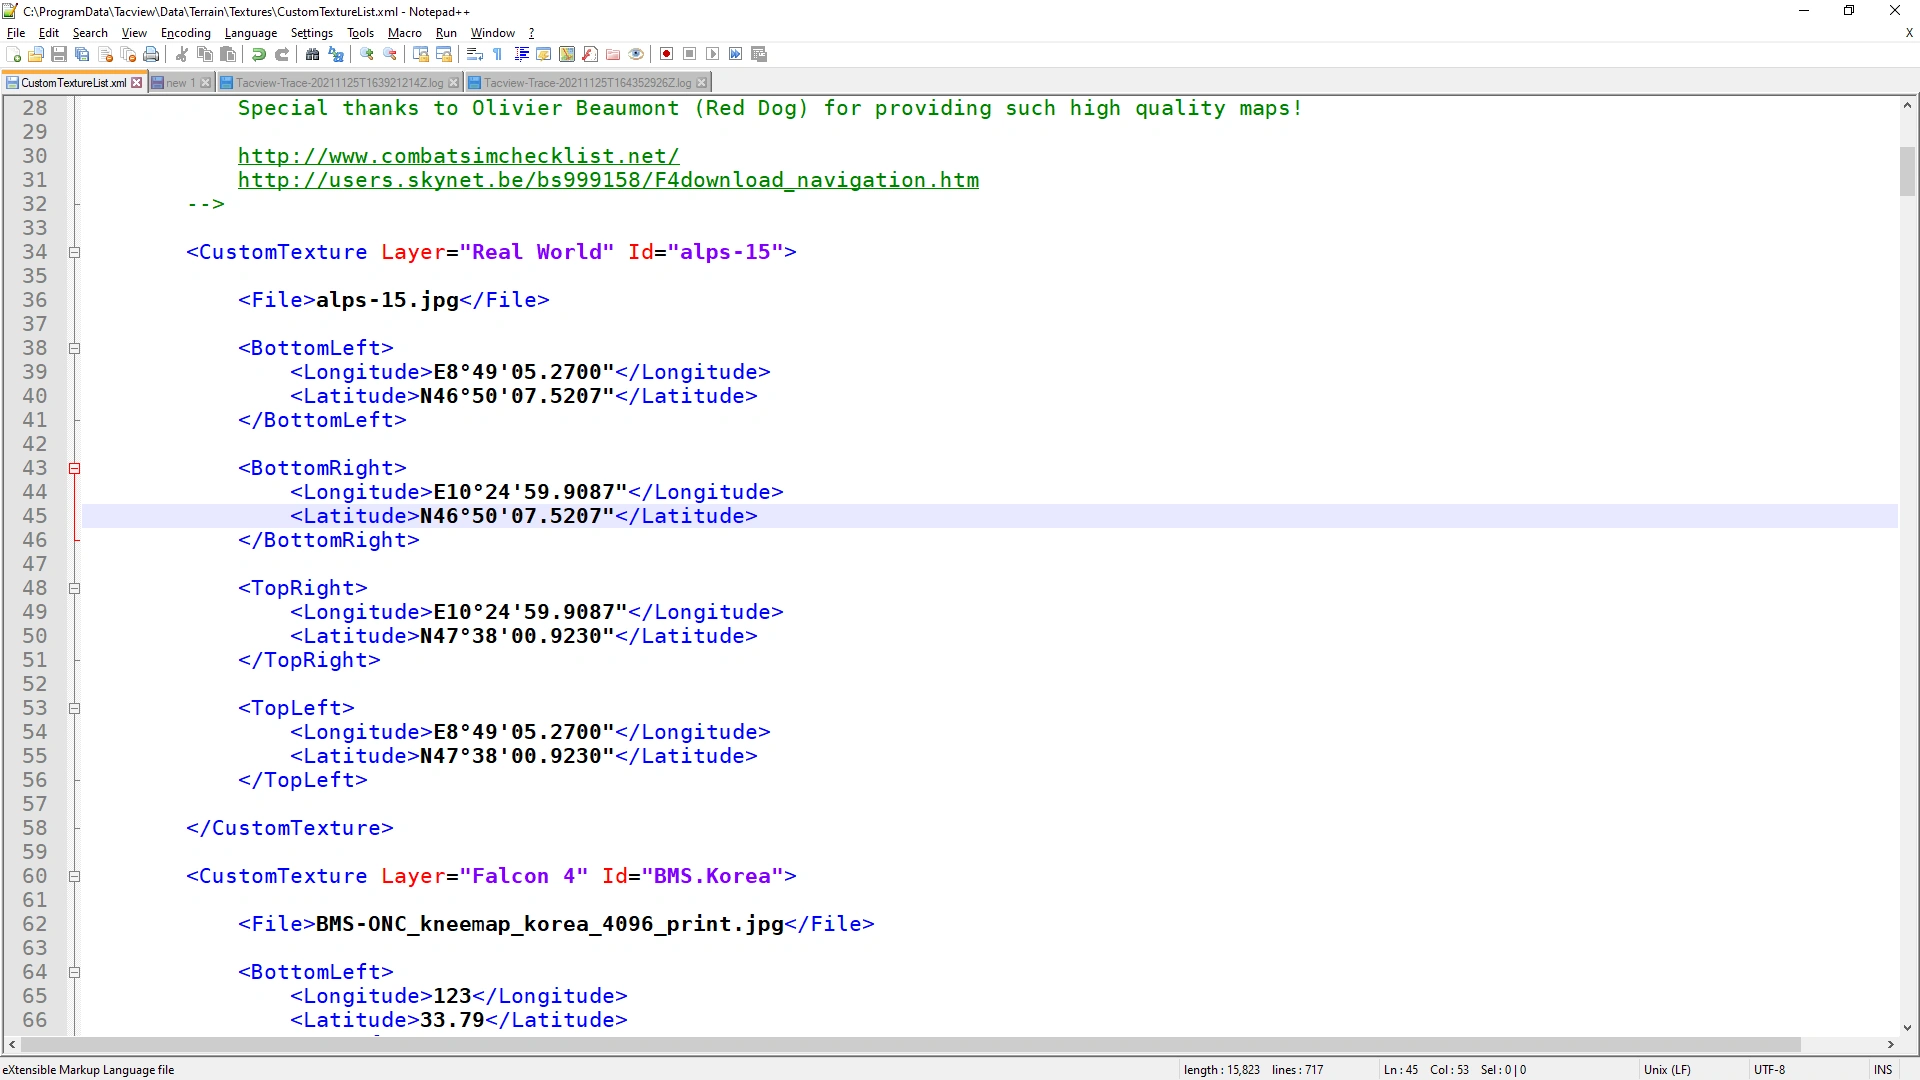
- Save to %ProgramData%\Tacview\Data\Terrain\Textures\alps-15.jpg
- Map: Bing Maps - satellite
- Overlay layer: No
- Projection: Geographic (Latitude/Longitude) / WGS84 / EPSG:4326
- Zoom: 15
- Quality: 95%
Click Start.
Copy paste the file %ProgramFiles(x86)%\Tacview\Data\Terrain\Textures\CustomTextureList.xml to %ProgramData%\Tacview\Data\Terrain\Textures\
Manipulating the CustomTextureList.xml file now found inside %ProgramData%\Tacview\Data\Terrain\Textures\, follow the instructions in the file to add a new entry.
To get the coordinates of your rectangle, go to By Coordinates:


Re-launch Tacview:

To get the resolution shown in the screenshot at the very top of this page, repeat the steps above over very small area using Zoom 18.
You may wish to download, say, a "large" (1 degree by 1 degree max) area of Zoom 15 satellite resolution and within that area display a smaller area of Zoom 18 satellite resolution.
Make sure the smaller, higher-resolution tile is listed in CustomTextureList.xml after the larger, lower-resolution one - the textures are loaded in the order they appear in the file.